Use SQL Server Compact with .NET 7/8 and Entity Framework (Classic) with Database First work flow
In this blog post I will show how you can use SQL Server Compact 4.0 on a Windows desktop with .NET 7 (and later), with a Database First approach, assuming you already have a SQl Server Compact .sdf database file available.
Yes, I know SQL Server Compact is obsolete, but it still finds is uses in various scenarios, for example with the ability to have a simple solution for an embedded, encrypted database file on Windows. (I promise this could be one of my final blog posts on SQL Server Compact!)
In the walkthrough, there will be five stages:
- Installing any pre-requisites
- Create solution and projects in Visual Studio
- Generate Database First DbContext and entities
- Refer to the generated code from the runtime project
- Test functionality
Install pre-requisites
-
Install the SQL Server Compact 4.0 runtime MSI
-
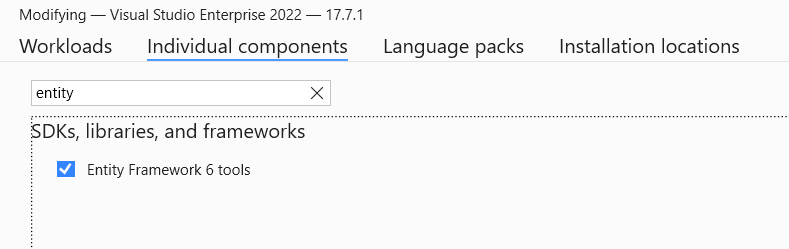
Install Visual Studio 2022 with
Entity Framework 6 Tools
- Install the
SQLite / SQL Server Compact Toolbox Visual Studioextension via Extension Manager in Visual Studio.
Create solution and projects
-
Open Visual Studio
-
Create a blank solution with the
Blank Solutiontemplate -
Add a
.NET Framework Class Libraryproject - name it SqlCeDesign, and delete Class1.cs -
Add
.NET Console App- target .NET 7 (or event .NET 8 and later) - name it SqlCeRuntime
The .NET Console App represents the final app, the .NET Framework Library is used as a placeholder for code generation only.
Generate Database First DbContext in design project
-
In SqlCeDesign: Add the NuGet package
EntityFramework.SqlServerCompact -
Build the SqlCeDesign project
-
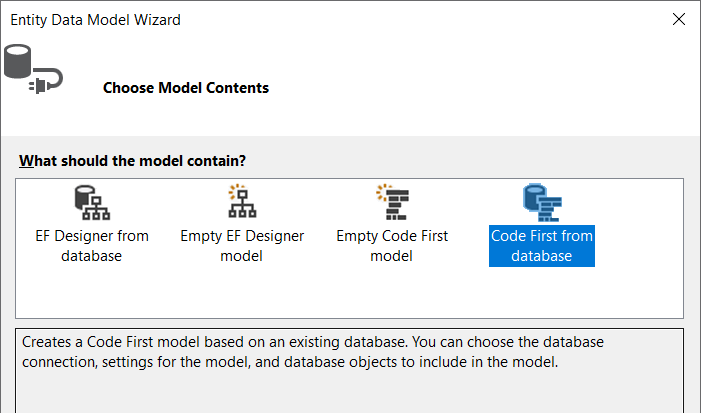
In SqlCeDesign right click the project and select Add, New Item, ADO.NET Entity Data Model, change name to Northwind, and click Add
-
Select Code First From Database
-
Choose your database, New connection, use Data Source:
SQL Server Compact (Simple by ErikEJ) -
For the Data Source property, enter the path to your existing SQL Server Compact .sdf file
-
Next, pick objects, and Finish
Use generated code in runtime project
- In SqlCeRuntime, create a Models folder, and link the generated files from the design project to it in the .csproj file:
<ItemGroup>
  <Compile Include="..\SqlCeDesign\*.cs" Link="Models\%(Filename)%(Extension)" />
</ItemGroup>
- In the SqlCeRuntime project, add my .NET 7 compatible SQL Server Compact Entity Framework 6 (Classic) provider (which is based on the officical provider from Microsoft) in the .csproj file. This provider includes the SQL Server Compact runtime, so there is no need to install this on the users computer. This allows you to simple xcopy deployment of the app.
<ItemGroup>
	<PackageReference Include="ErikEJ.EntityFramework.SqlServerCompact" Version="6.4.0-*" />
</ItemGroup>
Please read through the readme details to understand usage and configuration.
- In the SqlCeRuntimeproject, add this constructor to your DbContext in a partial class named after your DbContext class, for example Northwind.partial.cs:
public partial class Northwind
{
  public Northwind(string connectionString)
      : base(connectionString)
  {
  }
}
Verify that runtime app works
- In SqlCeRuntime, test your app in Program.cs:
using System.Data.Entity.SqlServerCompact;
using System.Data.Entity;
using SqlCeDesign;

DbConfiguration.SetConfiguration(new SqlCeDbConfiguration());

var connectionString = "Data Source=C:\\Tests\\Northwind.sdf";

using var ctx = new Model1(connectionString);

ctx.Database.ExecuteSqlCommand("SELECT 1");

var shippers = ctx.Shippers.Where(s =>  s.CompanyName == "Speedy Express").ToList();

foreach (var shipper in shippers)
{
    Console.WriteLine(shipper.CompanyName);
}
That's it, you can now query and update your SQL Server Compact Database with Entity Framework from a .NET 7 and later Windows app.